How to Dig A Plug When Metal Detecting (Step-by-Step)

Written by Piotr Lesniewski
Detectorist • Scotland
As an Amazon Associate we earn commission from qualifying purchases. Read our full Affiliate Disclosure.
You've found your target with the metal detector, but now comes the moment that separates responsible detectorists from those who leave a trail of destruction.
The way you extract your find determines whether you'll maintain access to prime hunting locations or face locked gates and angry landowners.
Most beginners make critical mistakes in these next few minutes that could've been easily avoided with the right technique.
Key Takeaways
- Use pinpoint mode and a handheld pinpointer to accurately locate the target's center point before digging.
- Cut a U-shaped plug 6-8 inches wide and 4-6 inches deep, leaving one side as a living hinge.
- Use a sharpened serrated hand digger to make clean, precise cuts around three sides of the circle.
- Carefully extract the object with fingers and use the pinpointer to check for remaining targets.
- Refill the hole completely, flip the plug back, and press firmly to restore the site seamlessly.
Essential Tools and Equipment for Proper Plug Digging
The right tools can make the difference between a clean, professional plug and a messy hole that damages the landscape.
You'll need a sharpened hand digger or serrated trowel as your primary digging tool—dull blades tear grass rather than cutting cleanly. A handheld pinpointer saves time by precisely locating targets without expanding your hole unnecessarily.
Pack a small trash pouch for unwanted items you'll inevitably find. Consider bringing a spray bottle filled with water for hard, dry soil that resists cutting. A drop cloth or towel protects surrounding grass from scattered dirt.
Your metal detector's pinpoint function works alongside these tools to minimize digging area. Quality equipment costs more upfront but preserves land better and makes property owners more likely to grant future permissions.
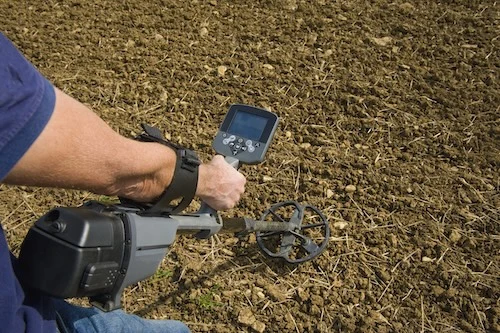
Pinpointing Your Target With Precision
Why waste time digging oversized holes when precise pinpointing can reduce your excavation to a fraction of the size?
Start by using your detector's built-in pinpoint mode to narrow down the target's location. Switch to this mode once you've found a signal, then sweep slowly to identify the center point where the audio peaks.
For even better accuracy, invest in a handheld pinpointer. These compact tools let you probe within inches of your target, often eliminating guesswork entirely.
Mark the exact spot with your finger or a small stick before cutting your plug.
Don't rush this step. Spending an extra minute pinpointing saves you from digging multiple holes or creating unnecessarily large excavations that damage the ground.

The Correct U-Shaped Cutting Technique
Creating clean, professional plugs starts with mastering the horseshoe or U-shaped cutting technique.
You'll want to cut three sides of a circle while leaving one side intact as a living hinge. Make your cuts approximately 6-8 inches wide and 4-6 inches deep, depending on your target's depth and soil conditions.
Use a sharpened serrated hand digger for clean, precise cuts that won't damage grass roots. Start at one point and work around in a smooth motion, applying steady downward pressure.
The uncut side acts as your hinge, keeping grass roots connected to their soil base.
Never cut a complete circle—this kills the grass and creates obvious detection marks. The hinge ensures faster recovery and healthier regrowth.
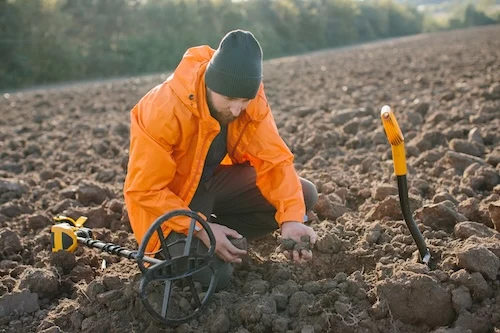
Locating and Retrieving Your Find
Once you've flipped back your U-shaped plug, grab your pinpointer to zero in on the target's exact location.
The item could be sitting in the hole itself or stuck within the dirt of your plug. Slowly sweep your pinpointer around the cavity first, then check the underside of the flipped plug.
If you don't immediately locate it, remove small amounts of soil carefully with your hands or digging tool.
Don't rush this step—you'll avoid damaging valuable finds.
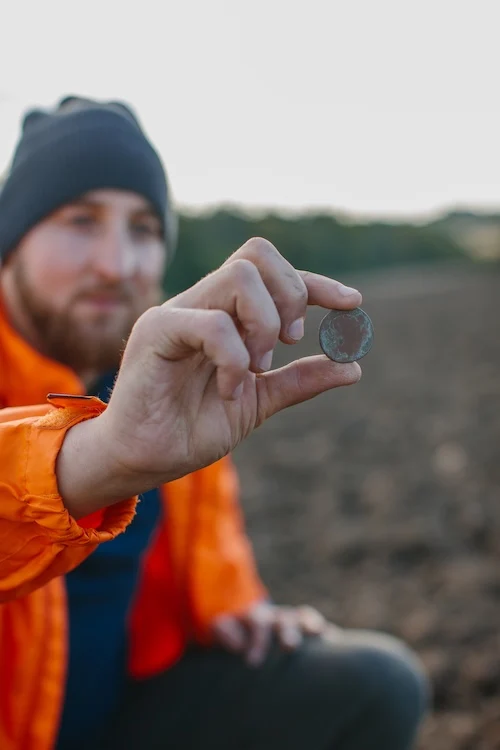
Once you've pinpointed the signal, gently extract the object using your fingers rather than metal tools when possible.
Clean off excess dirt and examine your discovery before moving to the final step of restoring your plug.
Restoring the Site to Original Condition
After you've successfully retrieved your find and examined it, the work isn't finished. Restoring the site properly ensures you'll maintain access and protect the environment.
First, refill the hole completely using all excavated soil. Don't leave any loose dirt scattered around the area.
Next, flip your hinged plug back into position carefully, ensuring grass roots remain intact. Press down firmly with your foot to eliminate air pockets and create a flush surface.
Brush or rake the grass to blend your work seamlessly with surrounding vegetation. Remove any trash you've uncovered during digging.
Finally, step back and inspect your work—the area should look untouched. This responsible approach preserves detecting privileges for everyone.
Conclusion
You'll master plug digging with practice, but remember that proper technique isn't just about finding treasure—it's about respecting the land you're detecting on.
When you follow these steps consistently, you'll leave no trace of your hunt while maximizing your chances of finding valuable targets.
Take your time, use the right tools, and always restore the site better than you found it.
Author Profile
Piotr Lesniewski
"Digging up the past, one signal at a time."
Polish-born, Scotland-based, and obsessed with the beep. My passion began decades ago, exploring fields with my Dziadek (grandfather). Now, with over 10 years of digging under my belt, I'm here to share everything I've learned—unfiltered and unbiased—to help you unearth your own piece of history. No sales pitches, just real field experience.